12.23.2008

My favorite holiday tradition: Lefse

My heritage on my mom's side is essentially German and Norwegian - my grandmother is 100% German, and my grandfather is a mix, but a good chunk of that is Norwegian. Around Christmastime, though, the Norwegian influence takes center field when my grandma and I get together to make lefse. [Yeah, I know I just said it was my grandfather who's the Norwegian, but it's my grandmother that makes the lefse for him!]

lefse (lěf'sə) n. A round flatbread of Norwegian origin, traditionally made of a potato-based dough and baked on a griddle. [Norwegian, from leiv, flat cake, from Old Norse hleifr.]
(Definition taken from http://dictionary.reference.com/browse/lefse)

That about sums up the food definition of what lefse is. But in my family it means a lot more. It's the symbol of a day spent happily between my grandma and I in the kitchen - mixing ingredients, forming dough, rolling out and baking the lefse - all the while laughing and talking and catching up with one another. It's also a favorite treat in our annual family smorgasbord on Christmas Eve night - something that would be tragic to miss from the food spread of the evening.

I think one thing I've always liked about making lefse is all of the special equipment it requires - there's something about taking all of that stuff out each year and creating our annual holiday treat. It's the same feeling that you get when you take out those special plates and glasses for a special occasion - a rare occurrence made all the better from the special stuff used. Below, in the recipe, I have, whenever possible, tried to describe and/or show all of these special tools. It all makes me smile, just thinking about it!

The one issue I foresaw for this year's lefse-making was the milk and the Crisco in our lefse recipe. Dairy is always bad for me - I'm still eating nothing that has dairy or the potential to have touched dairy. And Crisco is awful - fully hydrogenated oils, partially-hydrogenated oils... my stomach does a flip every time I hear the word Crisco. [Stomach: "flip"] But my grandma, being the fantastic woman that she is, figured we'd just make the lefse this year with ingredients I can eat, and that way I won't miss out on anything. Score! And so we used soy milk and vegan shortening in place of the milk and Crisco called for in the recipe. And no one noticed any difference - it's still as delicious as ever!

And so, without further ado, I give you our modified lefse recipe (original ingredients provided in italics & parentheses next to subbed ingredients), with a series of pictures to give you a glimpse into the world of lefse-making. Hope you enjoy!

Old-Fashioned Lefse

Note: this is a full day job - you can't make the batter one day and cook the next. It pretty much all has to be done in one day. The only thing you can do the night before is cook and rice the potatoes. So make sure you've cleared your calendar for lefse-making day!

4 cups diced potatoes - cook 5 lbs russet potatoes, then dice, and this should be about 4 cups
1/3 cup vegan shortening (Crisco)
1 Tbsp sugar
1 1/4 tsp salt
1/4 cup soymilk (1% or skim milk)
1 1/2 cup flour

1. Cook potatoes and dice. Put a small amount of potatoes into a ricer and rice potatoes to get rid of all the chunks.

2. Combine potatoes, shortening, sugar, salt, and soymilk, whip up lightly. Let cool thoroughly. Add flour and knead smooth. Cut batter into thirds and make into rolls, wrap in waxed paper

3. Divide batter into thirds. Place each third on a sheet of waxed paper, tightly roll the paper around the dough (making a log shape), and twist the ends - it should look like a giant tootsie roll. Place the 3 dough logs into the fridge to cool for about 1 hour. Note: do not leave overnight - the rolls will disintegrate to mush!

4. Once cooled, take out 1 roll at a time, unwrap, and cut into 1/2-inch thick slices.

5. Roll slice on floured pastry board (our rolling pin has a cloth sock on it; our pastry board is a round board with cloth over top), making it thin, as close to a circle as possible. Use plenty of flour, but don't go overboard with it - you want enough so the batter doesn't stick but not enough to "drown" the dough and make it tough.
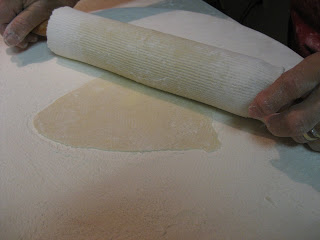
6. Roll topside lightly with grooving roller. (Don't turn over and groove other side - since it's so thin, the underside gets a little groovy, too.) [Haha...groovy...]

7. Using lefse stick, lift lefse from center.

8. Set on hot griddle (ours is an electric, round, brushed metal griddle - set to 375-400), rolling the stick out from underneath.

9. Bake until golden brown on topside.

10. Use lefse stick to lift from middle and turn to bake other side, again rolling lefse stick out from underneath. Bake until brownish spots like those on top appear on the bottom side of the lefse. (Each side should take no more than a minute or two.)

11. Use lefse stick to lift lefse off of griddle. Place flat (same roll out from underneath technique with stick) on a clean towel and cover with a second towel. Place several sheets of lefse on top of each other to finish cooking them in their own steam. No more than 10-12 per stack.

12. Once lefse stacks have completely cooled, fold in 4ths and place in plastic bags - no more than 4 to a sandwich-sized bag. The best way to keep extras is to freeze them. Keep in fridge no longer than 4-5 days.

To serve (at least the way my family does it):
- plain (my favorite!)
- spread thinly with butter/margarine and sprinkle sugar on top, roll
- sprinkle cinnamon-sugar mix on top, then sprinkle a few drops of lemon juice on top, roll or fold

These may not all be the "Norwegian" way to eat lefse, but I never said we were 100% Norwegian! Hah!
12.16.2008

The Onion verdict

...not to be confused with The Onion newspaper - of awesome!

Onions were the food of the week last week. And I've discovered that I can eat them, but they have to be baked and not the feature ingredient. I can use them for flavor, so long as I'm not really ingesting large quantities of them at one time. So, I'll probably do a lot of diced onions mixed with things, or else use big chunks of onion and then remove them before serving.

Immediate Reaction
Nothing really.

2 Hours Afterward Reaction
Too much onion gives me heartburn. But very small quantity doesn't create any noticeable symptoms.

2 days Afterward Reaction
Too much onion ends up creating gas bubbles in my stomach, and also dries up my system a bit. Smaller quantity still dries up my system, but not nearly as bad, and also no gas bubbles in the stomach.

So the fun part of the story is that I can actually use onions again!

This week is an off-week, since I'll be flying to MN at the end of the week, and I want my digestive system in top condition before going up in the air. But my week in MN will be the week I try out pepper. So excited for this!

And so, without further ado, my onion reintroduction recipe:

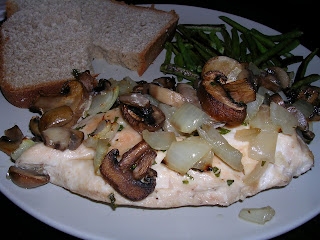
Baked Chicken with Mushrooms & Onions

Served up with steamed green beans and a slice of pear-cinnamon bread? Delicious. There's no online link for this recipe - I got it from my hairstylist. This is apparently her kids' favorite dish - she says they ask for it all the time. I now understand why!

2 chicken breasts, boneless, skinless
1 package of brown mushrooms, cut into thick slices - I used a package of baby portobellos
1 small yellow onion, chopped into 1-inch chunks
Extra virgin olive oil
Fresh parsley, finely chopped

Preheat oven to 500 deg F.
1. Wash chicken breasts and place in roasting pan.
2. Add mushroom slices and onion chunks around the chicken, but not on top of the chicken.
3. Splash with a few small dabs of olive oil over everything - enough to make everything shiny without drowning anything in oil.
4. Bake at 500 for 20 minutes. Reduce oven temp to 400 deg F. Bake chicken for another 20-25 minutes, or until done. Use a meat thermometer to check chicken - it should be at or above 165 deg F.
5. Serve chicken with mushrooms and onions sprinkled on top.

My addendum here has to do with the onions. Instead of chopping them into 1-inch chunks, chop the onion into 4 chunks, and place one chunk in each corner of the roasting pan. Bake as directed. When chicken is done, remove onion.

12.15.2008

Chicken, Apples, Cinnamon, Honey, Sweet Potatoes, Kale, Garlic, Sea Salt

Okay, no, I did not make something that included all of those ingredients. That's a rather disconcerting thought, really. But I did make 2 somethings using those ingredients! I baked some chicken with apples, using a cinnamon-honey-apple juice marinade, and then I cooked up a hearty sweet potato & kale soup with a bit of garlic and sea salt.

Dinner has never been so good.
[Yeah, I know every time I post I say that the recipes I'm writing about are the best ever - well, it's not that they keep getting better necessarily, but more like I still get overly exciting by food that tastes like something after all of those months with the blandest food ever.]

So why these two things tonight?

Well, in the case of the chicken, my goal over the last week and this week was to learn how to bake whole chicken breasts without drying them out. And I have all of these canned apple slices in cinnamon-spiced water from last fall when I joined my cousin and her friends for a canning party featuring apple-y things. (We also made apple butter and apple sauce, yum!) So I figured I'd see if I could combine the two (chicken breasts go with apples, right?). This is my favorite part (well, second to actually eating the final product...): I googled "chicken apple slices bake" - figuring I'd hit a few recipes and I could pull from them and try out my chicken and apple experiment. Instead, I found this recipe, and the only tweaking necessary was leaving out mesquite spice. Score! Oh, the power of google...

My other goal for this week was to learn how to cook kale. Didn't matter how, I just really wanted to know A) what it tastes like, and B) how to make it look and taste edible. Random goal, you say? Not really - lately I've been reading a lot about kale being really good for you and being chock full of vitamins. And hey, I'm always down with something that will pump me full of vitamins from a natural source! Here's my favorite part about this soup: it's thick enough to be considered "hearty" (in that it doesn't have transparent broth), but still light enough so that it fills without making me feel stuffed. Big bonus points for that one!

And thus, we have a dinner of chicken & apples and sweet potato & kale soup. The last comment I have before I leave you with 2 delicious recipes:

Sea salt. I've always heard it's 1,000 times better than regular salt. Today I can honestly and whole-heartedly agree. Wow, what a difference!

Baked Chicken with Apples

This recipe comes from the Twin Cities Dining Guide online (yeah, funny coincidence that the perfect recipe for what I'd envisioned also comes from MN!). Check it out here - complete with link to make the mesquite seasoning I left out of my version.

1/4 tsp cinnamon
2 cups apple juice [go with the good foggy stuff, none of that transparent juice!]
1/4 cup honey [I used pure MN honey from our property neighbor in Southern MN - you will likely not have access to this stuff, but I do suggest pure honey over processed honey - tastes so much better]
2-3 chicken breasts, cut in half width-wise
~2 medium apples, peeled, sliced and soaked in cinnamon, nutmeg, and cloves until saturated [these were the canned slices I mentioned above]
spray cooking oil

Preheat oven to 375.
1. Mix together apple juice, honey, and cinnamon until honey has dissolved completely in apple juice (this is not heated).
2. Place chicken breast halves in mixture and marinade for about 1-1.5 hours. Turn at least once during that time period.
3. Once chicken has marinated, place in glass baking dish that has been lightly sprayed with cooking oil. Spread apple slices atop the chicken pieces. [One thing I learned: I had too much liquid in the baking dish because I poured the excess water from my canned apple slices into the dish. Yeah, not a good idea. Minimal liquid - the chicken has enough having been soaked for over an hour!]
4. Bake for 45 minutes, and check. If the temperature of the chicken is at or above 165 deg F, it's done. If not, back in the oven for another 10-15. The original recipe calls for baking for about an hour, but that was just a tad bit to much for me. Also, the top-most apples should have a little bit of a singed look, so if they still look mushy, I'd put it back in for a little longer.
5. When chicken has 15 minutes left to bake, pour marinade into a saucepan over medium heat and reduce until it's about half the volume of what it originally was. Use this as a sauce to top the chicken and apples when ready to serve.

One note: even though I thoroughly enjoyed this dish, I felt like there was a little something missing. This could be a function of not including that mesquite seasoning from the original recipe, so I'll be tinkering with this recipe in the future to try and find something to round out the taste.

Another note: the sauce/marinade strikes me as a great combination that has potential for uses in many other places. This sauce could certainly turn up again in a future post...


Sweet Potato & Kale Soup

This is my new favorite soup - it even wins over butternut squash soup, and that's really saying something! Find the original recipe here. I didn't stray from it too much, actually. I omitted a couple of things, but otherwise it's pretty close.

1 quart chicken broth (can be veggie broth if you're vegetarian)
3 cups water
1/2 tsp sea salt
1 1/2 pound sweet potatoes or yams, peeled and cut into 1-inch cubes
1/4 tsp garlic granules
1 large bunch kale, washed and chopped into 1-inch pieces
sea salt to taste

1. In a soup pot, over high heat, bring chicken stock, water, garlic granules, and sweet potato cubes to a boil. Once boiling, reduce to low heat and simmer for about 15-20 minutes, until sweet potatoes are "fork tender" (recipe's phrase - i.e. easily pierced with a fork).
2. Using a potato masher or a whisk, mash about half of the sweet potatoes. The more you mash, the thicker the texture of the soup. [Note: I have no idea how to figure out if I've gotten only half mashed and left the others whole. I used a whisk and just mashed and whisked the heck out of the broth until it was as thick as I wanted it.]
3. Add the kale and push down into hot soup until covered with liquid. Once all of the kale has wilted (meaning all of it has been thoroughly covered with liquid), simmer over low heat for about 15-20 minutes until kale is tender and tasty. The note from the recipe states that undercooked kale can have a bitter flavor - and after 15 minutes, I tasted my kale and it was a little bitter, so it's a good thing to remember.
4. Season with sea salt - not too much though or you'll out-salt the natural flavors of the sweet potatoes and kale!

Serve warm with a piece of fresh baked bread. Oh so good!

12.14.2008

Soup from scratch - an adventure story

In Mid-November, I went to an Intro to Zen Buddhism weekend retreat at Dai Bosatsu Zendo, a Zen Buddhist monastery up in the Catskills Mountains. This is less random than it may sound. A friend of mine was recently ordained as a Buddhist monk at DBZ, and has been a resident there off and on for the past couple of years (though obviously, right now, he's more of a permanent resident). I visited him once about 2 1/2 years ago, on a cold Sunday-Monday in late March [...when it was still very much snowing in the mountains and I was so cold I wore every article of clothing I'd brought along for my 25-hour-long visit!] I went back this past June for his ordination, and so the Intro Zen weekend marked my 3rd trek southwest of Boston into the middle of the Catskills to once again see their little piece of paradise.

And I don't say paradise lightly. Every time I go up there, drive up that last hill to see the lake stretching out before me, cross the little wooden bridge, park, and walk down the lane of pine trees that slowly reveals the monastery, hidden amongst the trees... the raw beauty of the place takes my breath away. I love the silence, the stillness, and yet the force of activity from the nature all around them. I like the big sky full of stars at night, I like the green everywhere in the summer and the gentle grace of falling snow in winter. It's a place where one can set one's mind completely free, set aside all pesky nuisances of life, and just be. You know how everyone has that place in their minds where they retreat to when they need to regain a sense of calm in the bustle of everyday life? For some, that place is purely imaginary. For me, that place is their mountain. It is the complete and total opposite of the city, and it's fun to return to every now and then.

But, I digress...
[So easy to do when thinking again of that mountain!]

While at the Intro Zen weekend, it was quite interesting to get a peek into the life my friend leads up there. And it is by no means easy. Sitting zazen (silent meditation) was difficult both in trying to quiet my mind and the physical pain it unleashes. We worked, we got up way before dawn, we moved through a very full day every day. Even meals (their formal versions of meals) were difficult because of the very exact set of rules surrounding how meals are to be performed and eaten. It's not just a matter of sustenance. It's a matter of grace, beauty, and mindfulness. [The residents were very kind in helping all of us Intro students to follow the rules in the correct order - lessening the stress of trying to remember it all!]

Ah, but the meals. Beyond the difficulty of remembering how to eat, when to eat, in what order, and then how to clean and put away all of my dishes (and it what order), the food was spectacular. Their chef - Seizan - is out of this world fantastic. Everything he made smelled fabulous and tasted even better. I looked forward to meals (even with the knowledge of the inevitable stress that went with figuring out the ritual of eating once again) just to get a chance to eat his food again. I got to help out in the kitchen on Sunday, and spent my time chopping, cutting, cooking, peeling - and watching him almost dance around his kitchen, working his magic as an entire meal for 30-some people unfolded before him. [I would not mind going back simply to work with him in that kitchen for awhile and pick up some ideas for things to do in my own kitchen!!!]

One dish, in particular, though caught so much of my attention, that a week after leaving the monastery, I still had an enormously strong craving for it! Don't ask me to name it officially, because I'm not sure what to call it really. My pet name for it has become "Seizan's Soup," which from my perspective refers to only one soup, but from the monastery residents' perspectives could mean any number of hundreds of soups that I'm sure he's crafted for them. Call it what you will, though, it is delicious.

And so, I emailed my friend, the monk (ha - one of my pet names for him), to ask if he'd get the "recipe" from Seizan. Now, I use quotes around "recipe" because I knew I would never get something that had been neatly printed up on a card. Seizan creates things from scratch - there are no recipe cards. But, with so little time between the making and the email I sent, I was hoping that Seizan would remember how he'd done it and be able to give me the general structure of the soup - and then I'd take it and work with it until I got it somewhat right. [It will certainly take me quite a few tries to get it to resemble something remotely as beautiful as what he made!] What luck, then, to receive an email from my friend, the monk, with pretty well detailed instructions on how to make the soup. Like I'd expected, there were very few quantity instructions, but the basic elements and the order in which to perform them were all there.

Suddenly, a challenge - to see if I could replicate and make something edible. A challenge and a delightful adventure in my kitchen!

I won't bring you through the whole process, and I won't be posting the recipe until I have a better sense of what to do and how to do it and how much of everything to use. However, I will give you the highlights of my adventure and some pictures of my final product:

The adventure actually started at Whole Foods, where I had to buy quite a few things I'd never even heard of before, or at least had no idea where to find them in a store. The ingredient list went something like this:
- kombu (a thick, dried Japanese seaweed)
- dried shiitake mushrooms
- peels of burdock root
- carrot peels
- celery leaves
- parsley stems
- onion
- bay leaves
- rosemary
- sage
- thyme
- corn oil
- scallions
- Brussels sprouts
- potatoes
- baby white mushrooms
- green beans

I managed to find everything without help - miraculously! Brought it home and realized that, in addition to the adventure of actually attempting to make this soup, the other adventure would be to find creative ways to use the celery, burdock root, carrots, and parsley that I'd have left once collecting peels, stems, and leaves for the soup. Heh. Roasted veggies with parsley & sage anyone? Mighty tasty - carrots, burdock root, and celery doused in a generous helping of chopped fresh parsley. Mmm.

The soup starts the night before: soak some of the kombu and some dried shiitake in the water for the soup overnight. Did you know that dried seaweed smells so sweet? I sure didn't!

And, when I eventually post the recipe, you will not believe the intricacy and complexity of this soup! It looks so simple at the end, when you go to eat it, but really, the layers of flavor and different ingredients are quite numerous! Awesome, I say. Truly awesome.

Cooking the soup took some doing. I messed up a few times along the way - but discovered that this soup base is mighty forgiving. [Always a good thing!] It ended up being an entire day project, but in the end I had a soup base to boil the veggies in for the final product that looked sort of like what Seizan had created and described for me... tasted pretty similar, too. I've got a really good base to start off of now - and now I can work on tweaking quantities to get a mixture that I like better.

Oh yeah, and whatever the obstacles and hiccups I met along the way, my kitchen smelled so fantastic all day today as I cooked this soup. I'm definitely looking forward to that aroma the next time I make this!!!

I leave you with a picture of the final product - complete with chopsticks, since that's the original way I ate this soup, and I felt really weird not eating it with chopsticks at home...

[The steam shows you that this is fresh out of the stock pot. Mmm, hot soup.]

12.10.2008

A New No-List

I've been a little lazy when it comes to updating this list. Though, to be honest, it hasn't changed all that much in the last month, so it's part laziness and part feeling little need to update something that changes very little.

However, I am adding a new section of the list - the approved items list. I guess this technically doesn't make sense under the header "the No-List," but it's easier for me to keep it all in one place. You can see the approved items list at the bottom of the No-List. It certainly won't be as extensive or detailed to begin with, but will become so as I work on introducing more foods back into my diet.

And now, without further ado (because, really, you know the drill here), the updated No-List:

Switching lists:
onions
They're not off the No-List, but they get to switch to the limited items list. Full removal from the No-List pending final approval from my stomach by the end of Sunday.

Keeping on the list:
apple peels
That was a bust. Oh well, it's not the end of the world... And I'm so used to peeling my apples now, anyway, that it's become a soothing part of fixing a meal or snack that includes an apple!

The Updated No-List

NO items

- tomatoes/tomato-based foods (includes ketchup, bbq sauce, salsa, etc.)
- citrus fruits
- peppermint/spearmint
- chocolate
- alcohol
- caffeinated beverages
---regular tea
---coffee
---colas
---energy drinks
---other caffeinated soft drinks
- decaffeinated coffee and decaffeinated regular tea (herbal tea w/o mint is okay)
- carbonated beverages
- pepper
- high-fat dairy products
---2% milk and whole milk
---cream
---high-fat cheeses
---high-fat yogurt
---chocolate milk
- other dairy (from previous lactose intolerance guidelines)
---cow's milk
---soft cheeses
---butter
---cheesecake
- foods containing any trace of lactose (this includes foods on which the label says "made/processed/packaged in same facility as milk products")
- cocoa
- fried meats
- bacon
- sausage
- pepperoni
- salami
- bologna
- frankfurters/hot dogs
- other fried foods:
---doughnuts
---french toast
---french fries
---deep-fried vegetables
---omelettes, scrambled eggs, and other fried eggs
- pastries and high-fat desserts (the directive on this item: say goodbye to bakeries)
- chips
- store bought cookies, candies, sugary snacks of any kind
- hydrogenated and partially-hydrogenated oils
- high fructose corn syrup
- high-sodium foods
- peanut butter, and other nut butters
- cheese
- vinegar
- bell peppers, and other members of the veggie pepper family
- broccoli
- cauliflower
- asparagus
- celery
onions --Yay!
- beans (green beans are currently allowed)
- apple peels (apple flesh is fine, cooked/baked apples are better)
- red grapes (green grapes okay in moderation)
- raspberries
- salad dressing (check the labels, every one of them has something on the No-List!)
- store-bought juices (check the labels, all of them add citric acid!)

Limited Items
- maximum of 40-50g of fat per day
- oils (olive, vegetable, etc.) - 1 Tbsp has 14g of fat
- nuts - 1/4 cup or 2 Tbsp, nut butter has 17g of fat **nut butters currently prohibited entirely
- processed sugar
- onions

Approved Items
- whole grains
- lean meats (non-spiced)
- fish / canned tunafish (low-sodium)
- vegetables
--low-acid tomato-sauce (good for pasta sauce or salsa): limited to once every 3 days
--carrots
--green beans
--potatoes
--sweet potatoes
--lettuce
--squash
--mushrooms
--peas
--corn (no more than 1 serving every few days)
--brussels sprouts (boiled or baked, not raw or undercooked)
--pumpkin
- fruits
--apples (no peels)
--pears
--grapes (no more than 1 serving per day)
--berries (no strawberries or raspberries, unless cooked into something)
--bananas
--dried fruits (1-2 servings a day maximum)
- soy milk
- corn/rice cakes
- spices (all in limited quantities) - not all-inclusive, there are some I've never had before, and therefore don't know how they react in my system
--cinnamon
--nutmeg
--salt
--ginger
--oregano
--basil
--parsley
--thyme
--rosemary
--sage

12.04.2008

The Time Has Come (subtitle: Pizza Take 2)

My whole life, I have resisted mushrooms. Ew, said I, They're so slimy, and they smell funny, and they're fungus. Ewwww! -So goes the musings of a small child's mind set on not liking something. The only way you'd get mushrooms down my throat was if they were cut up and mixed in something so I couldn't really taste them or so I wouldn't know if I weren't paying attention. [I'm convinced my grandmother got me to eat more mushrooms than she'll ever let on...]

About a month ago, however, I realized 2 pretty big things concerning mushrooms.
1. They don't taste so bad, if cooked well. And in fact, I can go so far as to say they taste good. [gasp!]
2. My stomach/system loves them. Seriously, I can feel my stomach smiling. -And that is HUGE!

So, I've broken down and started looking at how to cook with mushrooms. I made soup with whole mushrooms just boiled in it. (Don't worry, I'll be blogging about that soon enough...) And tonight, I made pizza again - this time with cut up mushrooms on top! (There's some fresh parsley on there as well - yum!)

And so now I'm thinking about mushrooms - I'm rather interested to see what I can do with them! I feel like Joy of Cooking and I will be having a good heart-to-heart before too long about mushrooms. The search is now on for mushroom-featured recipes that I can actually eat! Future posts will reveal what I've found! [You know what's funny - I just went to check my Gmail, and the ad header above my inbox was featuring a Mushroom Casserole recipe from 101 Cookbooks... what a crazy coincidence!]

But for now, I leave you with pictures and recipe for the pizza I had for dinner tonight. [Mmm, that's the sound of my stomach smiling...]

Cheeseless Mushroom Pizza with Fresh Parsley


1 pizza crust
3 medium-sized potatoes
~3/4 cup chopped baby white mushrooms
~1 handful of chopped fresh parsley (um, seriously, I have no idea how to measure how much I put on...)

Use pizza recipe through Step 3.

This time, I sprinkled on a generous helping of chopped mushrooms, and then sprinkled on parsley until I felt like it looked green enough without drowning out the other colors. [Because really, food is more an art than a science.]

I baked this one for about 21 minutes, and got a crispier crust and got some nice golden brown edges on the potatoes - you can see them in the picture!

[The funny story to go along with this recipe is that when I went to cut my pizza, my pizza cutter broke, and the blade (thankfully) whipped past me and rolled across the kitchen floor. Blinking with a slight about of shock from almost getting gutted by a pizza cutter, I went to pick it up, and checked the blade (because, really, the crust wasn't that crispy...). Wow - dullest pizza cutter ever! I've only used that thing once!!! And so, this pizza was cut with a nice sharp steak knife - serrated edges are good for crispy things. Never a dull moment in my kitchen - unless you're my former pizza cutter...]

12.02.2008

A glimpse into my daily food life...

So, I generally post about new creations or exciting meals or new food ideas/combinations when I do a recipe post here. But I realized recently that this leaves out a lot of the yummy stuff I eat on a fairly regular basis. The stuff that sort of creates my base from which I start from when experimenting, or reintroducing food, or whatever. The silent heroes of my food world.

And so, I dedicate this post to them - the little guys of my daily menus. Hope you enjoy!

Crispy Brown Rice Cereal with Bananas

...aka the breakfast of champions. I love this breakfast. It's just satisfying enough to get me through the morning without filling me up and making me sluggish (I've already got enough of that going on from the mere act of getting out of bed in the morning).

1 cup rice crisp cereal (Not Rice Krispies. Kiss those guys goodbye - they're horrible for you! I use Erewhon's Wheat-Free Crispy Brown Rice Cereal. No particular reason for the wheat free other than that they don't make it with wheat. There's a gluten-free version as well, if you need that.)
1 medium-sized banana
1/2-2/3 cup vanilla soymilk

I keep a 1-cup measuring cup with my cereal box in the cupboard. No joke. Measure the cereal out. Slice the banana into really thin slices on top (because I think it's more fun to have thinner slices than thicker slices). Pour soy milk on top. Fold bananas underneath the cereal, and enjoy! Sometimes I'll have some applesauce/puree with breakfast, but most mornings this cereal-banana combination is all I have.

Tunafish & Peas Open-Face Sandwich

[Note the slight black tinge to some of those peas - that's no shadow! See below for more...]

It's one of my all time favorites for lunch. I pair it with some thinly sliced apple pieces (sans peel, of course) and a glass of water, and I'm good to go for a good 2-3 hours until my next mealtime! The idea comes from one of the old hotdishes Mom used to make when I was little. We called it Creme Tuna on Rice (purposely spelled wrong for some reason...) - it had tunafish and peas mixed into a can of cream of mushroom soup - and then all of that got put on a pile of rice. Delicious!

But, since I can't go for the cream of the mushroom soup, or any of the other bad stuff in the Campbell's can, I thought I'd use a few elements and lighten it up for my enjoyment. I always make it using a whole can of tuna (because really, what am I gonna do with leftover tunafish from a can?) and it generally lasts me the work week. Perfect!

1 can tunafish - in water, no salt or low salt (we're talking under 80 mg of sodium in the can here)
~2-3 servings frozen peas (honestly, I really have never measured this - it's usually "enough to make the colors of tuna (pale pink) and peas (green) balance out" - however much that is...)
~2-3 Tbsp low-fat, vegan mayo (okay, you can use any mayo you like, I found this stuff at Whole Foods without any high fructose, hydrogenated awfulness)

1. Put peas in small pan with a very small amount of water - like not quite enough to cover the base of the pan. Cover and simmer on very low heat for about 6-8 minutes. [You may want less time to cook the peas, actually - I like my peas just a tad charred on the bottom, so I generally leave them over the heat until there's not an ounce of water left and they start to sizzle - right before they start to turn black on the bottom. I think it gives the mixture a nice, slightly smoky taste. But to each their own.]
2. While the peas are cooking, open tuna can and use the cover to squeeze out as much moisture as you possibly can from the tuna. Once done, empty the tuna into a small bowl, breaking up any large chunks.
3. Mix in about 1.5 Tbsp mayo - or just enough to get the tuna moist and mixed together nicely.
4. When the peas are done, let them cool for a minute or two (not completely cool, but enough so you wouldn't burn yourself if you ate one), then dump them into the tuna mix.
5. Gently fold the peas into the tuna, adding a 1/2 Tbsp of mayo at a time until you get it just moist enough to all hold together.
6. Spread on plain bread or toast and enjoy! [This is where apple-cinnamon or pear-cinnamon bread is fantastic! Toast up a slice and spread this tuna mixture on top and you have a sandwich swirling with flavor - especially if you took my advice after all and charred those peas a little bit!]

Steamed Fresh Green Beans

[These ain't no store-bought "fresh" green beans shipped from who knows where - these are genuine Massachusetts-grown beans from the local Farmers' Market! Mmm...]

I will often steam a bunch of these for dinner one evening, and then use the rest for snacks throughout the week. Refrigerate them, and they're good to go for about a week. 1 serving is 1/2 cup of green beans. Now, seeing as you can't really shove these in a measuring cup all that nicely, I've found that about 10-12 beans (uncut) are roughly 1 serving - perfect for a midday snack!

Ingredient list? Just green beans from the Farmers' Market, and um, some water...

1. Steam the green beans. This can be done in any number of ways. I have a large stock pot with a fitted steamer to put the beans in. You can buy one of those insertable fold-out steamer things, too. The point is to have the water not touch the beans directly.


2. Eat 'em, put 'em in stuff, refrigerator and munch on 'em later. However you dish them up, they are beyond delicious!

Mashed Potatoes with Brown Sugar

[Simple, yummy, easy to make, and it's have brown sugar - is there any possible way that this isn't the perfect dish?]

I've come to enjoy playing with side dishes just as much as I enjoy playing with the main course of my meals. And I've found that side dishes are only as boring as you make them. You can spruce up anything and make it suddenly taste infinitely better - even things you know you already like! This is my new favorite for mashed potatoes...

A couple of potatoes - I used some Yukon Golds from the Farmer's Market
Regular soy milk
Brown sugar

1. Wash and peel the potatoes. Cut into 1-inch cubes and boil until very soft.
2. Drain the water, then put the potatoes back in the pot over extremely low heat. Mash the potatoes most of the way, then pour in a little soy milk and mix. Continue until you get them as creamy as you like them.
3. Put them in a teacup and sprinkle some brown sugar on the top. Voila! Spruced up mashed potatoes that look adorable with any meal! This also does very well as a mid-evening snack if I'm going to be up late and need something else after dinner to keep my energy up.

[Ha, that's right, folks. I said teacup. Think about it - usually those poor just sit in a formless blob on your plate, looking rather colorless as well. Kinda drab. Put 'em in a teacup, and they're suddenly way more fun to eat! Also, this is a sneaky way to get yourself to eat only one serving of potatoes. Because filling up the teacup will make you think you're eating way too much, but filling 1/2 to 2/3 full is about 1 serving of potatoes. Wha ha ha - portion control is all about tricking the brain into thinking it's eating enough food!]